Saturday, December 17, 2016

Comparing file with Vim

There are many diff tools to compare files like vimdiff, kdiff3, diffmerge, etc, but then why should I use Vim to compare files ? I regularly use diffmerge to compare files, but it hungs while comparing large log files ( for ex. I found it difficult to compare 20MB log file).

Also some time I just want to compare some section of build log, for example I want to compare the successful build log vs failed log at some section of build target. Typically build logs contain time stamp pre-fixed in the beginning and if I compare 2 build logs, almost every line differs between them.

So in such cases I just prefer to view two log files side-by-side using vim using the following vim options


  1. Open log1
    • vi log1.txt
  2. split the screen vertically
    • :split
  3. Switch to the right-portion
    • ctrl+ww
    • You can use this to toggle between screens
  4. Open another file to compare in right-portion
    • :o log2.txt
  5. Two scroll down both sides of the screen together
    • Start with leg-side by typing below option
    • :set scrollbind
    • Switch to right portion and type the above option again
    • To unset this -> :set noscrollbind

Tuesday, December 13, 2016

Programming Jenkins jobs with Job DSL

The Jenkins job configuration can be programmed using Job DSL, instead of manually configuring it for the following advantages

  • Job configuration can be version controlled under tools like GIT.
  • Easily apply modifications to numerous existing jobs, by changing code and re-running DSL
  • It provides the centralised location to view and analyse all Jenkins job config information
What you need to start with Job DSL?
  • Job DSL Plugin
  • Little bit of Groovy language knowledge

Job DSL Plugin

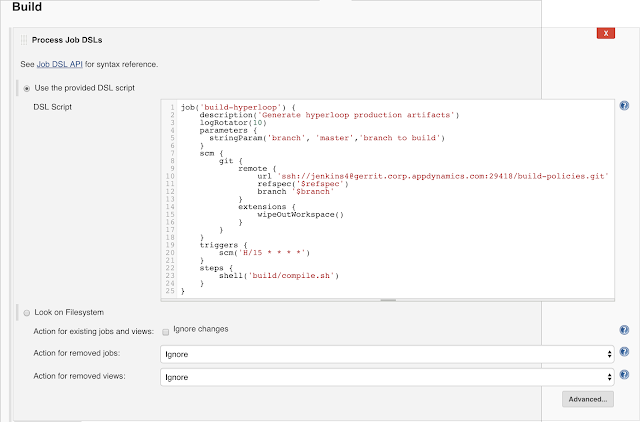
Install Job DSL plugin and then you'll get a new build step, 'Process Job DSLs' under 'Freestyle project'

Usage

You can run DSL code either

1) By providing DSL groovy code directly at 'DSL Script' section. This option is useful while testing your DSL code. In the below screen shot contains DSL instruction for the job named 'build-hyperloop'


2) or Store your DSL code in a groovy file (for ex. myjob.groovy) and ensure it is available in the job workspace. Select 'Look on Filesystem' option and provide the location of this groovy code at 'DSL Scripts'


Now save and 'Build' this job and it will create a new Jenkins job by name 'build-hyperloop' if not exist or if this job already exists, then it updates the job with this configuration

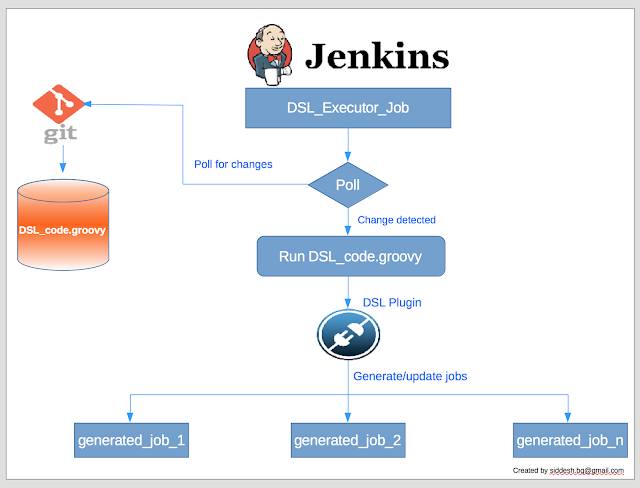
End to End flow

Wednesday, March 2, 2016

JSON Example with Java + Jersey + Atlassian Stash

This is a sample Java program to read a Git branch information hosted in Atlassian Stash using REST web-services. In this code Jersey Client used to contact Stash. The JSON output is parsed to display branch information.

------------------------------------------------------------------------------------------------------
import javax.ws.rs.client.Client;
import javax.ws.rs.client.ClientBuilder;
import javax.ws.rs.client.Invocation;
import javax.ws.rs.client.WebTarget;
import javax.ws.rs.core.MediaType;
import javax.ws.rs.core.Response;

import org.glassfish.jersey.client.ClientConfig;
import org.glassfish.jersey.client.authentication.HttpAuthenticationFeature;
import org.json.JSONException;
import org.json.JSONObject;

public class Try1 {
public static void main(String[] args) {
               // Load server and authentication details to Jersey client
ClientConfig clientConfig = new ClientConfig();
HttpAuthenticationFeature feature = HttpAuthenticationFeature.basic("siddesh", "*****");
clientConfig.register(feature);
Client client = ClientBuilder.newClient(clientConfig);
WebTarget webTarget = client.target("https://mycompany/stash/rest")
.path("api/1.0/projects/MYPROJ/repos/MYREPO/branches").queryParam("filterText", "MYBRANCH");

                // send request to server
Invocation.Builder invocationBuilder = webTarget.request(MediaType.APPLICATION_JSON);

                //parse response
Response response = invocationBuilder.get();
System.out.println(response.getStatus());
System.out.println(response.getStatusInfo());
String myResponse = response.readEntity(String.class);
System.out.println(myResponse);

System.out.println("=============================");
try {
JSONObject jsonObject = new JSONObject(myResponse);
//JSONObject branchName = jsonObject.getJSONArray("values").getJSONObject(0).get(displayId);
System.out.println(jsonObject.getJSONArray("values").getJSONObject(0).get("displayId"));
} catch (JSONException e) {
e.printStackTrace();
}
}
}
------------------------------------------------------------------------------------------------------

Output

200
OK
{"size":1,"limit":25,"isLastPage":true,"values":[{"id":"refs/heads/MYBRANCH","displayId":"MYBRANCH","latestChangeset":"352f25ss099xx2b1be4c4cce26430ad257e3845f","isDefault":false}],"start":0}
=============================
MYBRANCH

Wednesday, February 24, 2016

Extending Salt - Quick Start

Create a SLS file with Jinja code ( the one which got enclosed in flower {} brackets.

# cat /srv/salt/file/base/jinja/simple_var.sls
{% set simple_var = 'a simple variable' %}
jinja_var:
  cmd.run:
    - name: echo "Simple var is {{ simple_var }}"

Test the jinja based SLS file
# salt vag* state.show_sls jinja.simple_var

Jinja list example

# cat /srv/salt/file/base/jinja/list.sls
{% set list1 = ['one', 'two', 'three'] %}
jinja_list:
  cmd.run:
    - name: echo "List is {{ list1 }}"


# salt vag* state.show_sls jinja.list

Jinja example to access a particular list item

# cat /srv/salt/file/base/jinja/list_item.sls
{% set list1 = ['one', 'two', 'three'] %}
jinja_list_item:
  cmd.run:
    - name: echo "List item 2 is {{ list1[2] }}"

# salt vag* state.show_sls jinja.list_item


Jinja dictionary example

# cat /srv/salt/file/base/jinja/dict.sls
{% set my_dict = {'first': 'value 1', 'second': 'value 2'} %}
jinja_dict_first:
  cmd.run:
    - name: echo "First item is {{ my_dict['first'] }}"


# salt vag* state.show_sls jinja.dict

Jinja listing dictionary keys example


Monday, January 4, 2016

Salt Grains and Pillars

Grains

Grains are minion data calculated when minion starts. It contains static data like OS version, CPU cores, etc. This data is generated in minion and presented to master.

List the default grains configured on a minion.


  • salt  vagrant-centos65.vagrantup.com grains.ls   # This just lists the keys
  • salt vagrant-centos65.vagrantup.com grains.items  # This lists all the keys & values
  • salt vagrant-centos65.vagrantup.com grains.item os  --out=txt  # single value

 Setting Grains

  • salt vagrant-centos65.vagrantup.com grains.setval myenv prod 
  • salt centos65-minion grains.setval myenv stage
  • salt ubuntu-14.04-amd64-vbox grains.setval myenv dev
  • salt vagrant-centos65.vagrantup.com grains.setval roles '[webserver,appserver]'
  • salt centos65-minion grains.setval roles '[webserver,appserver,database]'
  • salt ubuntu-14.04-amd64-vbox grains.setval roles '[webserver,appserver,database]'
  • salt \* grains.item myenv roles   # query all of these roles

Pillars

Pillars are data from the Master. Pillar data is stored on the master. But the data is available only for the given minion.

Querying pillar data

  • salt \* pillar.items

Configuring pillar root in masters configuration

--------------------------------------------
# cat /etc/salt/master.d/pillar.conf
pillar_roots:
  base:
    - /srv/salt/pillar/base
--------------------------------------------
  • service salt-master restart

Pillar Top file

--------------------------------------------
# cat /srv/salt/pillar/base/top.sls
base:
  '*':
    - default
--------------------------------------------

--------------------------------------------
# cat /srv/salt/pillar/base/default.sls
my_data: some data for stuff
--------------------------------------------

Pillar data for user management

--------------------------------------------
# cat /srv/salt/pillar/base/users/all.sls
users:
  wilma: 2001
  fred: 2002
  barney: 2003
  betty: 2004
--------------------------------------------

--------------------------------------------
# cat /srv/salt/pillar/base/users/stage.sls
users:
  wilma: 2001
  barney: 2003
  betty: 2004
--------------------------------------------

--------------------------------------------
# cat /srv/salt/pillar/base/users/dba.sls
users:
  wilma: 2001

--------------------------------------------

Re-touch Top file

--------------------------------------------
# cat /srv/salt/pillar/base/top.sls
base:
  '*':
    - default


'G@myenv:prod and G@roles:database':
  - match: compound
  - users.dba

'myenv:stage':
  - match: grain
  - users.stage

'myenv:dev':
  - match: grain
  - users.all

--------------------------------------------

Validate the top file

[root@vagrant-centos65 base]# salt \* pillar.item users

Sunday, January 3, 2016

Salt states - Quick Start

Set up the file server

  • As per the master configuration file /etc/salt/master, the  master will automatically include all config files from /etc/salt/master.d/*.conf
  • Create the below file in master
# cat /etc/salt/master.d/file-roots.conf
file_roots:
    base:
    - /srv/salt/file/base
  • Restart the Salt master
# service salt-master restart
Stopping salt-master daemon:                               [  OK  ]
Starting salt-master daemon:                               [  OK  ]
  • This sets up our Salt master with our file_roots directory.

SLS file

  • Create the below SLS (Salt State) file