Thursday, December 31, 2015

Salt common modules

sys.docReturn the docstrings for all execution modules and functions
  • salt * sys.doc test.ping
  • salt-call sys.doc test
  • salt-call sys.doc  # To see documentation for all modules
sys.state_doc: Get help for state modules and functions. Return the docstrings for all states.
  • salt-call sys.state_doc user.present
sys.list_modules: List the execution modules loaded on the minion
  • salt-call sys.list_modules
sys.list_functionsList the execution functions for all modules. 
  • salt-call sys.list_functions sys 

SaltStack: [ERROR] The master key has changed and [CRITICAL] The Salt Master has rejected this minion's public key!

When the IP address of Salt master got changed and then a salt-minion started throwing the below error

[ERROR   ] The master key has changed, the salt master could have been subverted, verify salt master's public key
[CRITICAL] The Salt Master server's public key did not authenticate!
The master may need to be updated if it is a version of Salt lower than 2015.8.3, or
If you are confident that you are connecting to a valid Salt Master, then remove the master public key and restart the Salt Minion.
The master public key can be found at:
/etc/salt/pki/minion/minion_master.pub
Invalid master key


To get rid of this error, I ran below commands on troubled minion
  • cd /etc/salt/pki/minion/
  • mv minion_master.pub minion_master.pub.old
  • mv minion.pem minion.pem.old
  • mv minion.pub minion.pub.old
  • salt-key --include-all --reject='ubuntu-14.04-amd64-vbox'         #on master
  • service salt-minion restart
  • salt-key --include-all --accept=ubuntu-14.04-amd64-vbox --yes      # on master
  • service salt-master restart                    # on master
But this didn't help. The minion started throwing another error

root@ubuntu-14:/etc/salt/pki/minion# salt-call test.ping
[CRITICAL] The Salt Master has rejected this minion's public key!
To repair this issue, delete the public key for this minion on the Salt Master and restart this minion.
Or restart the Salt Master in open mode to clean out the keys. The Salt Minion will now exit.


To get rid of this error, I had to run
  • salt-key --delete-all   # on master
  • service salt-minion restart  # on all minions including master
  • salt-key --accept-all


Tuesday, December 29, 2015

Remote debug a Atlassian Stash plugin from Eclipse

While developing a Atlassian Stash plugin, you may need to debug the code using break points in Eclipse. But since the Stash plugin is deployed on a remote web container (though it is in localhost), you can't debug it straight way. You need to establish a remote debug session

Step 1: Run your stash application in debug mode

  • atlas-debug

Step 2: Configure Remote Debug configurations in Eclipse

  • Run -> Debug Configurations -> Remote Java Application -> New 
  • Host = localhost
  • Port = 5005   # This is the debug port. Normal port is 7999

Step 3: Add a break point on your code in eclipse

Step 4: Run 'Debug'

  • Run ->  Debug

Step 5: Invoke your plugin

  • To get an entry to your code in eclipse, you need to touch the part of the application to which your code is related.
  • For example in my case, I went to Pull Requests (coz my plugin was dealing with pull requests) and clicked on one of the pending pull request.

Step 6: Start debug

  • Step Over (F6)  or Step In (F5)

SaltStack Quick start

Reference: This blog post is prepared by referring the book "Salt Essentials; Craig Sebenik & Thomas Hatch; Oreilly publications"

Installation

  • yum list salt salt-master salt-minion
  • yum install -y salt salt-minion   #Install these 2 packages on minions & master
  • yum install -y salt-master   # Install this package on master

Configuring master IP/DNS in minions

The basic minion configuration is located in /etc/salt/minion.You need to configure each minion with the DNS name or IP address of your Salt master. 

The default Salt master configured is

$ grep '#master:' /etc/salt/minion
#master: salt

This needs to be changed to our master IP or DNS name

Monday, December 28, 2015

Virtualization with Vagrant and VirtualBox - Quick Start


Getting Ready

  • Install Vagrant & VirtualBox
  • Visit http://www.vagrantbox.es/ and select a Vagrant Box you are interested. (Click on Copy to copy the URL)
  • mkdir -p vagrant/centos65
  • cd vagrant/centos65

Action!!!

$ vagrant init centos65 https://github.com/2creatives/vagrant-centos/releases/download/v6.5.3/centos65-x86_64-20140116.box

A `Vagrantfile` has been placed in this directory. You are now
ready to `vagrant up` your first virtual environment! Please read
the comments in the Vagrantfile as well as documentation on
`vagrantup.com` for more information on using Vagrant.


Wednesday, August 12, 2015

Sample perl script to query JIRA

Using the Perl module http://search.cpan.org/~gnustavo/JIRA-REST-0.010/lib/JIRA/REST.pm

#!/usr/bin/perl -w
use strict;
use JIRA::REST;
use Data::Dumper;

my $jira = JIRA::REST->new('https://my.jira.net/jira', 'username', 'password');

# Get issue
my $issue = $jira->GET("/issue/TST-704");
#print Dumper($issue);

print "priority=$issue->{'fields'}->{'priority'}->{'name'}\n";
print "assignee=$issue->{'fields'}->{'assignee'}->{'name'}\n";
print "key=$issue->{'key'}\n";

# Iterate using utility methods
$jira->set_search_iterator({
        jql        => 'project = "TST" and issuetype in (Bug, scope) and fixVersion in (1.1r4, 1.1R4) and status in ( Closed, Resolved )',
        maxResults => -1,
        fields     => [ qw/summary status assignee/ ],
});

print "=================================================\n";
print "ISSUE-ID:STATUS:SUMMARY\n";
print "=================================================\n";
while (my $issue = $jira->next_issue) {
        #print "Found issue $issue->{key}\n";
        print "$issue->{key}: $issue->{fields}->{status}->{name}: $issue->{fields}->{summary}\n";
}

GIT - How to find commits made specific to a branch?

I want to find commits made specifically to the branch 'rel-7.4-r16'. Here is the command

Simple
git log  refs/remotes/origin/rel-7.4-r16 --not $(git for-each-ref --format='%(refname)' refs/remotes/origin|grep -v refs/remotes/origin/rel-7.4-r16)
with log pretty format
git  --date=iso --pretty=format:'%h %ad %an %s' 
 refs/remotes/origin/rel-7.4-r16 --not $(git for-each-ref --format='%(refname)' refs/remotes/origin|grep -v refs/remotes/origin/rel-7.4-r16)

Tuesday, July 7, 2015

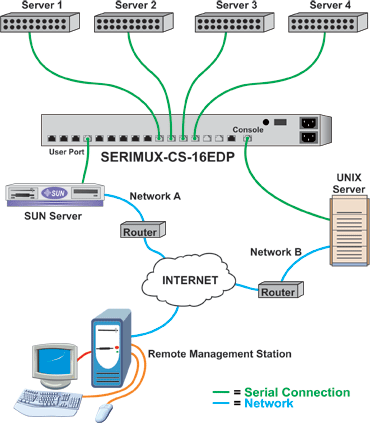
Serial console server - ??

Recently our OVF/OVA virtual appliance image generation build failed while connecting to a serial console server (or terminal server). A networking outsider like me had to browse and understand the functionality and usage of serial console server.

From Wikipedia & http://www.networktechinc.com/


A console server (or serial console server) is a device or service that provides access to the system console of a computing device via networking technologies. (From Wikipedia)


Most commonly, a console server provides a number of serial ports, which are then connected to the serial ports of other equipment, such as servers, routers or switches.

The consoles of the connected devices can then be accessed by connecting to the console server over a serial link such as a modem, or over a network with terminal emulator software such as telnet or ssh, maintaining survivable connectivity that allows remote users to log in the various consoles without being physically nearby.

Thursday, June 25, 2015

Atlassian Plugin Development

My Goal is to write a Atlassian STASH plugin.
Before getting started into plugin development, I need to install Atlassian plugin SDK.

I just started with the URL https://developer.atlassian.com/docs/getting-started/set-up-the-atlassian-plugin-sdk-and-build-a-project

My development environment is Windows and it  installed Atlassian plugin SDK under C:\Users\SBGurusiddappa\atlassian-plugin-sdk
  • This has bundled a maven 3.2.1 and it got a maven repository under it.
The  SDK got wrapper bash scripts (atlas commands), which are really cool.
The below atlas command can start a test instance of Jira
    atlas-run-standalone --product jira
This really cool to deploy and test the Plugin on Jira test instance.

Jira Plugin Development Highlights


  • Install JDK
  • Install Atlassian SDK

Running Jira Test Instance

  • Mkdir c:\atlastutorial
  • atlas-run-standalone --product jira
  • Access test jira instance at http://localhost:2990/jira   (login=admin password=admin)
  • Projects -> Create New Project -> Test Project (TEST)
  • Ctrl-Z  -> Gracefully shutdown JIRA
  • Restart JIRA standalone. (  atlas-run-standalone --product jira)

Creating a Jira Plugin

  • cd c:\atlastutorial
  • atlas-create-jira-plugin (Enter groupID, artifactId, version, package,etc)
  • Examine the plugin skeleton (src\main\resources\atlassian-plugin.xml - This file is the descriptor. It defines the plugin modules your plugin uses)

Load the helloworld plugin into Jira

  • atlas-run
  •  Access http://localhost:2990/jira  -> Administration ->  Add-ons -> Manage Add-ons -> Locate the helloworld plugin listings in User-installed Add-ons category.

Setup Eclipse IDE

  • atlas-mvn eclipse:eclipse (to make helloworld ready to be imported into Eclipse)
  • File > Import > General > Existing Projects into Workspace > Next
  • Select root directory > Browse > Your Atlassian plugin folder should appear under Projects.
  • Finish

Tuesday, June 16, 2015

Web scanning

Checking if the ports in given range (20-30) is open in target machine.

Use "nc" command in Linux machine

nc -z www.myweb.com 20-30
Connection to www.myweb.com 21 port [tcp/ftp] succeeded!
Connection to www.myweb.com 25 port [tcp/smtp] succeeded!

echo "QUIT" | nc www.myweb.com 20-30
220---------- Welcome to Pure-FTPd [privsep] [TLS] ----------
220-You are user number 1 of 50 allowed.
220-Local time is now 11:04. Server port: 21.
220-This is a private system - No anonymous login
220-IPv6 connections are also welcome on this server.
220 You will be disconnected after 15 minutes of inactivity.
220 Logout.


Port scanning using nmap

nmap -O www.myweb.com

Starting Nmap 5.21 ( http://nmap.org ) at 2015-06-17 05:18 IST
Nmap scan report for server15.blahblah.in (100.9.000.99)
Host is up (0.059s latency).
Not shown: 986 filtered ports
PORT     STATE  SERVICE
20/tcp   closed ftp-data
21/tcp   open   ftp
22/tcp   closed ssh
25/tcp   open   smtp
53/tcp   open   domain
80/tcp   open   http
110/tcp  closed pop3
143/tcp  closed imap
443/tcp  open   https
465/tcp  open   smtps
587/tcp  open   submission
993/tcp  closed imaps
995/tcp  closed pop3s
8888/tcp open   sun-answerbook
Device type: general purpose|WAP|VoIP phone|switch
Running (JUST GUESSING) : FreeBSD 6.X (89%), BinTec embedded (87%), Polycom embedded (85%), Symbol embedded (85%), Allied Telesyn embedded (85%)
Aggressive OS guesses: FreeBSD 6.2-RELEASE (89%), BinTec R1200 WAP (87%), Polycom SoundPoint 501 IP phone (85%), Symbol WS5000 wireless switch (85%), Allied Telesyn Rapier G6 switch (85%)
No exact OS matches for host (test conditions non-ideal).

Friday, May 15, 2015

Resolving GIT Windows/Mac case sensitive file names problems using sparse-tree

Linux OS allows you to add files with same name but with varied case in a same folder.
For example:

  • In the directory: /home/siddesh/git-area/myproj/dir1
  • I can add 2 files: fileName FileName
  • As you can see, the name of these files are same, but the capitilization is different
You can add these files into Git repository from Linux OS.

But when you clone this GIT repo on Windows, you'll get problems
----------------------------------

$ git status
On branch master
Your branch is up-to-date with 'origin/master'.

Changes not staged for commit:
  (use "git add <file>..." to update what will be committed)
  (use "git checkout -- <file>..." to discard changes in working directory)

        modified:   myproj/dir1/fileName
-----------------------------------------

Though you have not modified this file, it showing as modified. Because windows is case insensitive and it can't keep to files with the same name in the same folder
  • i.e. it can't keep  2 files: "fileName" & "FileName" in same folder.
You can't un-modify these changes
  • git checkout -- myproj/dir1/fileName
  • It doesn't help. Still it shows as modified
Even git doesn't allow you to switch branch peacefully.
---------------------------------------------------
git checkout -b newbranch origin/newbranch

error: Your local changes to the following files would be overwritten by checkout:
      modified:   myproj/dir1/fileName
Please, commit your changes or stash them before you can switch branches.
Aborting
-----------------------------------------------------------

You can't stash them as well. But you can forcefully switch the branch using "git checkout -f", but these modified files will carry forward to new branch to disturb your peace.

What is the fix?
  • You need to rename these files on a git repo checked out in Linux, commit and push it to repo
Any other solution until it is renamed?
You can use git "sparse-tree" feature, which comes in git version 1.7 & above. You can ask git to ignore this problematic folder from working area. 

  • git config core.sparsecheckout true
  • vi .git/info/sparse-checkout
---------------------------------------------

!myproj/dir1/*
/*
--------------------------------------------
"!myproj/dir1/*" : It means ignore myproj/dir1/*
/* :   It means add everything else

  • git read-tree --reset -u HEAD


Thursday, April 23, 2015

GIT FAQ's

FAQ's

How to extract commit message from the given commit ID?

$ git show -s --format=%B <COMMIT-ID>
or 
git log --format=%B -n1 <COMMIT-ID>

How to list commits submitted only on the specified branch?

$ git log <branch-name>

How to get the commit-ID, a remote tracking branch is pointing to?

 After fetch, if you want to know which commit-ID the remote tracking branch is pointing to, you can simply use the log command on remote tracking branch.
Ex:  $ git log origin/rel-sa81-8.1-r.3 -2

If you run the same command on local branch, you will see the difference
Ex:  $ git l1 rel-sa81-8.1-r.3 -2

How to fetch and rebase commits from remote branches?

I need to fetch changes only from a remote branch origin/rel-sa81-8.1-r.3.
$ git fetch origin rel-sa81-8.1-r.3

Now rebase the local branch with fetched commits
$ git rebase origin/rel-sa81-8.1-r.3

How to update a Personal repo "master" branch with remote reference repo "master" branch?

I have a personal repo by name "siddesh-myProduct" and it is a fork of "myProduct" repo.
Now "myProduct/master" branch got many commits after I forked "siddesh-myProduct/master".
Too synchronize "siddesh-myProduct/master" with it's reference, I use rebase.

#First create a remote pointer to "myProduct" repo.
$ git remote add myProduct https://siddesh@my.company.git/stash/scm/myProject/myProduct.git

# Fetch changes 
$ git fetch myProduct

#rebase
$ git rebase myProduct/master

#Push changes to my personal repo "siddesh-myProduct"
$ git push origin master

How to squash 2 commits into one?

git rebase -i origin/bugfix/PRS-326493~2 bugfix/PRS-326493
git push origin +bugfix/PRS-326493

How to discard last commit?

git reset --hard HEAD~1
git reset --hard <the sha1 hash>

Friday, January 9, 2015

WMIC (Windows Managment Instrumentation Command-Line) commands

WMIC commands are used for system management in Windows. Here are few wmic commands.

Invoking WMIC: 
1) Start -> Run -> wmic  or
2) Start -> Run -> Cmd -> wmic

Commands
1) "useraccount list brief " : Displays list of users, account types, domain, etc
AccountType  Caption                   Domain     FullName        Name          
512          Lenovo-PC\Administrator   Lenovo-PC                  Administrator

2) process where name='outlook.exe'
    Caption      CommandLine  CreationDate CSName   Description
OUTLOOK.EXE  "C:\Program Files\Microsoft Office 15\root\office15\OUTLOOK.EXE"  20150109101912.955375+330  LENOVO-PC  OUTLOOK.EXE

3) process where name="Skype.exe" get ProcessID,ParentProcessID
ParentProcessId  ProcessId
4864             7196
4) process where name='outlook.exe' call terminate

5) process list brief
HandleCount  Name                           Priority  ProcessId  ThreadCount  WorkingSetSize
0            System Idle Process            0         0          4            4096
2385         System                         8         4          138          10182656
280          chrome.exe                     8         5056       5            107802624
1064         Skype.exe                      8         7196       39           185180160

6) wmic /node:"Lenovo-PC" printer list status  : To list the printers connected to this machine
Name                           Status
Send To OneNote 2013           Unknown
Nitro PDF Creator (Pro 9)      Unknown
Microsoft XPS Document Writer  Unknown
Fax                            Unknown

7) wmic /node:"Lenovo-PC" cpu get name, caption, maxclockspeed, systemname /format:textvaluelist.xsl

Caption=Intel64 Family 6 Model 60 Stepping 3
MaxClockSpeed=2594
Name=Intel(R) Core(TM) i5-4300M CPU @ 2.60GHz
SystemName=LENOVO-PC

8) wmic bios get Manufacturer,ReleaseDate,SerialNumber,Version
9) wmic baseboard get Manufacturer,Name,Product,SerialNumber,Version :  To get motherboard info
10) wmic bootconfig get BootDirectory,Caption,LastDrive,TempDirectory
11) C:\Users\SBGurusiddappa>wmic cpu get Manufacturer,AddressWidth,CurrentClockSpeed
,CurrentVoltage,DataWidth,Family,LoadPercentage,MaxClockSpeed,NumberOfCores,Numb
erOfLogicalProcessors,ProcessorId,ProcessorType -format:textvaluelist.xsl
12) wmic desktop get Wallpaper
13) startup list brief
14) timezone list brief